- Home
- Education
- Flooring Basics
- Weekend Upgrade: How to Install Click Vinyl
Weekend Upgrade: How to Install Click Vinyl
So you picked up an easy-to-install Click Vinyl floor. You can't believe the low price. Now, can you really do it "in a snap"?
Tranquility Click flooring can be installed on all grade levels (even below grade) and is designed to float over the subfloor. "No glue or nails needed!"
The vinyl floors can be used in high-humidity areas like full bathrooms, steam rooms and saunas. An obvious choice for extending flooring from the living spaces through the kitchen.
Will it be just an immediate wood-textured excitement, or will it be a value play that can be appreciated for years to come?
The difference is in the attention to the installation, and here's what you'll need to go for a lasting vinyl plank that wows:
What You’ll Need:
- Tape measure
- L square
- Utility knife
- Safety glasses
- Broom / vacuum
- ¼” spacers
We recommend sound proofing and insulation, so check out Tranquility LVT Underlayment. This will help support the joints and reduce sound.
The Subfloor: concrete, wood, existing sheet and tile flooring, ceramic tile and terrazzo (must meet flatness requirements)
Before you begin, make sure the approved subfloor is:
- Structurally sound and free from movement
- Clean, dry and free of defects
- Smooth and flat
Acclimation
Place the unopened cartons of flooring lying horizontally in the room it will be installed in for a minimum of 48 hours to acclimate. For best performance, maintain a room temperature of 55°F- 95°F, ideally 65°F- 75°F.
Preparation
- Remove existing shoe molding, quarter round and transition moldings.
- Undercut door moldings and casings to allow the flooring to fit underneath without restriction.
- Sweep and/or vacuum to remove all dirt and debris.
- For rooms larger than 50′ in any direction, T-moldings are required to account for the normal movement or expansion of the floor.
- Do not fit the floor tight against any fixed, vertical objects (walls, pipes, staircases, etc.)
- A minimum of ¼”? expansion space is required around the perimeter of the room and any fixed objects.
- For the best results, install planks from several boxes instead of working from one box at a time.
- All floating floors require cabinets or fixed objects be installed BEFORE installing the new planks. Do not install under kitchen cabinets.

Installing Your Click Vinyl!
- Determine direction the planks will be installed in.
- Minimize the end-joint “shadow”? by running board direction with the primary light source, not into it.
- Carefully measure the room to determine squareness and determine the width of the last row of planks. If the width of the last row is less than 2″? excluding the tongue, adjust the width of the first row accordingly.
- Inspect all planks for visible defects and damage before and during installation. DO NOT install damaged planks. During installation, inspect the groove area for any debris that may prevent proper assembly of planks.
The First Row
- The tongue side of the plank should face the starting wall, groove side facing outward. Begin laying planks on the left side of the starting wall and work to the right. Always use a share blade when cutting planks and change blades often!
- For board placement, two common options are:
- Start with a full plank for the first row, a ½ plank for the second row, and 1/3 plank for the third row, then repeat until complete.
- start with a full plank for the first row, a ½ plank for the second row and a full plank for the third row, then repeat until complete.
- Start by placing ¼”? spacers between the short and long side of the planks and the wall.

- Complete the first row locking the ends.

- The last planks will need to be cut. Measure the distance between the wall and the surface of the last full plank. Subtract ¼” from the measurement to allow for the spacer. If this measurement is less than 11″?the length of the first plank in the row should be adjusted. This will allow for a longer plank at the end of the row. The first and last plank in each row should be at least 11″ in length.

- The remaining piece cut off from the last plank in the first row will serve as the starter in the second row as long as it is at least 11″? long. Always stagger end joints from row to row to avoid seam line up with the previous row. Finish the first row.

The Second Row
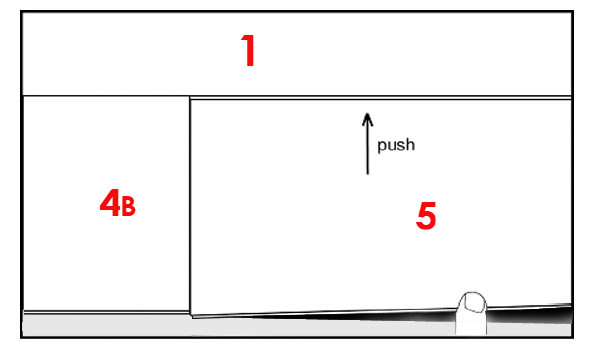
- Position the first plank of the second row with short end-side against the wall and the long side along the planks of the first row. Remember to place a ¼”? spacer between the wall and the plank. Fit the long side of the plank into the first row. Insert the tongue side into the groove side at approximately a 45 degree angle until planks lock together. Gradually lower the plank down flat until the joint clicks / closes.

- Align the plank so the long side tongue tip is positioned just over the groove lip of the plank in the first row.

- Using gentle force and at a 20 – 30 degree angle, push the long side tongue into the groove of the adjoining plank by sliding along the short side seam. You may need to lift the plank to the left of it slightly to allow for the “sliding”? action.

The last row of planks may need to be cut lengthwise to obtain the proper width. The width of the last row shall not be less than 2″.
Remember to allow for proper spacing from the wall.
Questions?
Search our Flooring 101 page or Call our Tech & Install Center at 1-800-651-1635
